Best Practices for Securing Zoom Meetings
 Keep Zoom links private
The following recommendation applies to all hosts and participants of Zoom sessions and can help keep the session secure from unwanted guests.
Do NOT make session links public
- Do not post session links on a public web site, calendar, social media, or other platform.
- Session links should be shared with specific participants via email or calendar invitations.
- Faculty can make Zoom invitations available to students through their D2L Brightspace course via emailing the class list, pasting in an announcement, adding it to the content area, etc.
- If you don’t have a meeting participant list, use a web form or other method to gather participant contact information and then email Zoom links to participants prior to the meeting
University Zoom Reminders
Update Your Zoom Client
- Zoom has released many updates recently to improve security of its platform. We are recommending that you update your zoom client to the most current version of the client if you have not done so recently. Zoom update guide can be found at the following link
Screen sharing limited to the host and co-hosts
- Participants will not have the ability to share their screens by default.
- You may modify this at the account level or while in a session to allow participants to share their screen.
Zoom Security Toolkit
The following options can be enabled or utilized to further protect your zoom session but may require more micromanaging by the host or limited functionality for the participants.
Most of the settings described below can be enabled when scheduling a meeting or while hosting a meeting. Modifying any of these options at the account level simply changes the default values.
Require Authentication to Join
A session which has been setup to require authentication will only be available to those who login prior to joining. This guide can be given to students and will walk them through joining a session that has been setup to require authentication. Remember, when enabling this option select “Ship Login” to ensure that participants use their Shippensburg credentials to login. NOTE that this setting cannot be configured during a live session but can be enabled after scheduling by editing a meeting.
Scheduling a Meeting to Require Authentication (Client)
- Open the Zoom Desktop Client.
- Click Schedule.
- Check Only authenticated users can join.
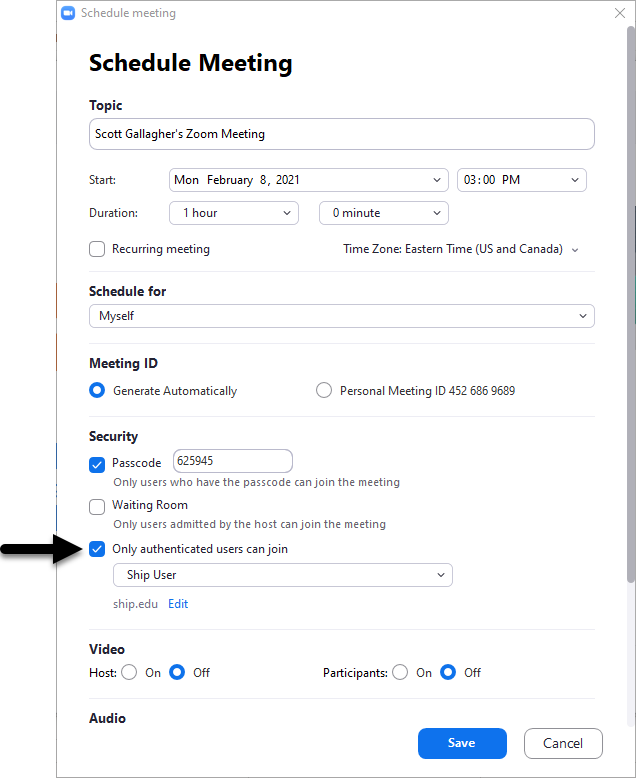
- Choose Ship User in the drop down.

Scheduling a Meeting to Require Authentication (Web)
- Login at ship.zoom.us
- Click Meetings.
- Click Schedule a Meeting.
- Under Security, check Require Authentication to join.
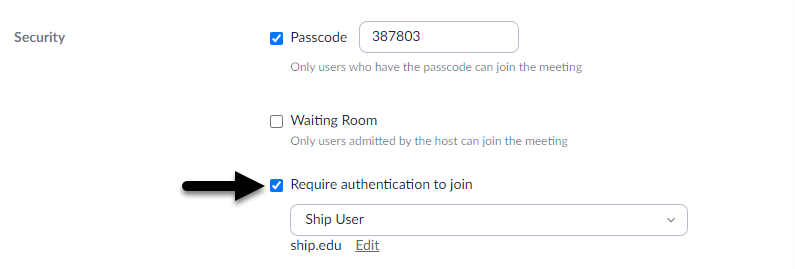
- Select Ship User in the drop down.

Enable Waiting Room
The Waiting Room feature allows the host to control when participants join the meeting. As the meeting host, you can admit attendees individually, or hold all attendees in the virtual waiting room and admit all when you are ready to begin.
Admitting participants from the Waiting Room into the live session requires an additional step for the host but provides increased control to only allow participants to join the meeting when you admit specifically admit them. This feature can be enabled on a per- meeting basis when scheduling.
- Guide to Enable the Waiting Room when Scheduling a Meeting.
- Guide to Enabling the Waiting Room by Default for All Meetings.
Disable Participants to Join Anytime
If you disable the participants ability to join anytime you can prevent students from joining a session before you’ve started it. Students will see a "Please wait for the host to start this meeting” notification when joining a session that does not have a host. If you are the host, there is a button to login and start the meeting as the host.
This feature can be enabled or disabled on a per-meeting basis when scheduling. Visit Join Before Host in the Zoom Help Center for additional information.
- Guide to Disable Join Before Host when Scheduling a Meeting.
- Guide to Disable Join Before Host by Default for All Meetings.
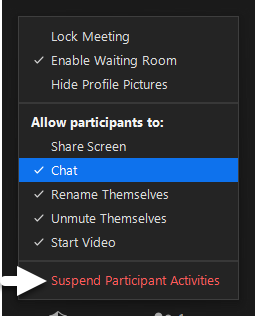
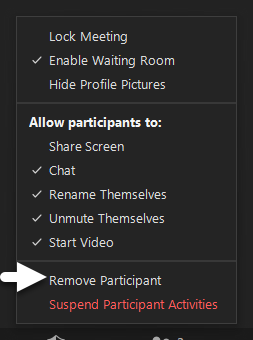
Suspend All Participant Activities
If needed, you can Suspend Participant Activities to quickly secure a meeting that is disrupted. Suspending will turn off everyone's audio and video, will stop any active screen sharing, and will lock the meeting, preventing any additional participants from joining. Please note that there is no quick way to undo this, and you’ll need to re-enable all the permissions and unlock the meeting under security once you’ve resolved the disturbance. Update your zoom client if you do not see this option.
To Suspend Participant Activities:
- Click Security at the bottom of the Zoom window.
- Click Suspend Participant Activities.
Remove a Participant
If you are the host or co-host in a session and notice an unwanted guest has joined or a participant is disruptive to your session, you have the option to remove them. This option only appears if you have participants in the session and will be hidden otherwise. Update your zoom client if you do not see this option.
Steps to Remove:
- Click Security at the bottom of the Zoom window.
- Select Remove Participant.
- Choose the participant you want to remove and click Remove.
NOTE: The removed user will be unable to rejoin until the meeting has been ended and restarted unless you have enabled the user setting Allow removed participants to rejoin will.
Lock Your Meeting
The Zoom Host Controls allow the host or co-host to lock the meeting once all anticipated participants have joined the meeting.
To lock your meeting:
- Click Security at the bottom of the Zoom window.
- From the menu that appears, click Lock Meeting.
NOTE: When a meeting is locked, no one else can join the session, regardless of having a meeting password. Neither the host, nor co-host will be alerted if someone attempts to enter a locked meeting, but you can follow steps above to unlock the meeting and allow additional participants in the meeting.
Disable Video Functionality
The host and co-host can disable video for any participant or all participants. Once video has been stopped, the user(s) cannot start their video again until you’ve returned the permission.
To disable video for a specific user:
- Click Participants.
- Hover the mouse over the user and click More.
- Click Stop Video.
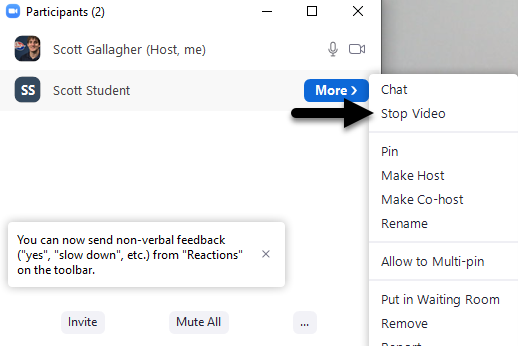
- To re-enable, repeat the process but click Ask to Start Video.
To disable video for all participants:
- Click Security.
- Un-Check Start Video.
- To re-enable, repeat the process but check Start Video.
Mute Participants
The host can mute all users or specific users from the participant window. Users will be able to un-mute themselves unless the instructor has disabled this option via the Security options.
Disabling participants ability to unmute themselves:
- Click Security.
- Uncheck Unmute themselves
- To re-enable, repeat the process but check Unmute Themselves.
NOTE: When disabled, participants can still speak as long as the instructor has requested that they be unmuted.
Mute Individual Participants
- Click Participants.
- Hover the mouse over the user and click Mute.
- To re-enable
- If Unmute themselves is checked the participant can simply turn their mics back on.
- If unmute themselves is un-checked than the instructor will need to repeat these steps but click Ask to Unmute in step 2.
Mute all Participants
- Click Participants.
- Click Mute All.

- Un-Check “Allow Participants to Unmute Themselves” if you want to prevent them from unmuting themselves.
- Click Yes.
Limit Chat Functionality
The Zoom host can limit chat privileges to prevent participants from using the chat if it becomes a concern. This can be done by the following steps while in a zoom session.
- Click Chat at the bottom of the zoom window.
- Click
 near the bottom of the window.
 - Select the desired option:
- No One: No one, including the host, can chat.
- Host Only: Only the host can chat.
- Everyone Publicly: All participants can use the chat.
- Everyone Publicly and Privately (University Default): All Participants can use the chat and send private messages.
NOTE: Not all private messages are available for the host to view. Only those messages that involve the host will be viewable by the host. Any private message between two participants is private and do not appear to the host.
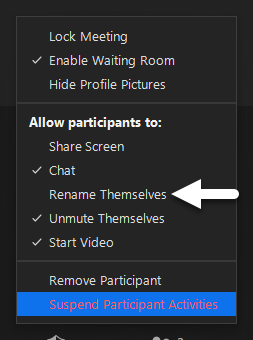
Renaming Participants
The Zoom host can rename participants during a session which can be useful when you have a participant who has joined with an inappropriate name.
- Locate the user in Gallery View and Right Click their window.
- Click Rename.
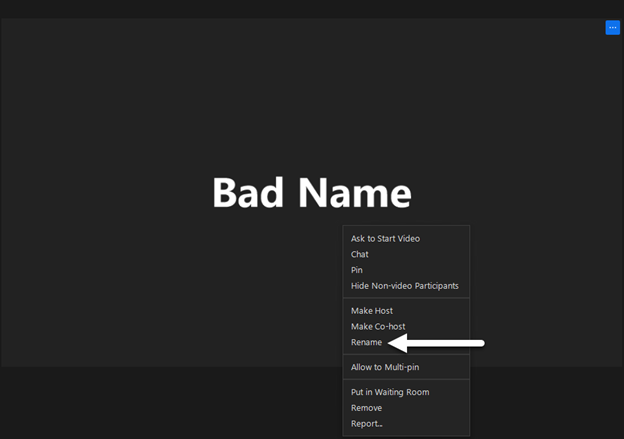
- Enter a new name and click OK.
- To prevent users from then renaming themselves, you can click Security and uncheck "Rename Themselves".