
Student Instructions
Students have exclusive control of the set up and maintenance of proxy access. Students control who has access, the timeframe within which they have access, and the information they may view. The university is not permitted to grant access or modify existing access for a student.
NOTE: A student’s preferred/chosen name is displayed to all proxies.
To add proxy access or review/change existing proxy access, students should follow the directions below.
How do I add a proxy?
- Log in to the Experience myShip
- Navigate to the Student – Quick Access
- Click the Student Quick Links
- Click on the Personal Information link under the My Personal Information
- Click on the Proxy Management
- Click on + Add New link located on the upper right side of the page.


- Fill in the proxy information.
- Relationship should be set to Proxy Person.
- Start Date and End Date should be used to set the date range the proxy will have access to the pages to which you provide access. For a parent or guardian, you may want to set the end date to your anticipated graduation date.
- Additional Information is optional. It may include a description of the proxy (e.g. parent, employer, etc.)
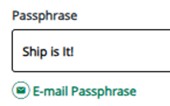
- Passphrase may be used if you wish to allow the proxy to call the following designated offices to discuss the pages to which they have been granted access.
- Academic Dean’s Office – Contact Information available at https://www.ship.edu/about/directory/
- Registrar’s Office – 717-477-1381
- Retention and Student Success – 717-477-1396
If you create a passphrase, you must return to the proxy information page after creating the account and use the Email Passphrase icon to send it to the proxy. The system will not email the passphrase automatically.
-
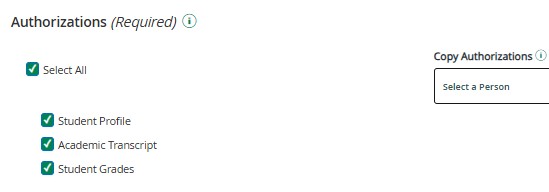
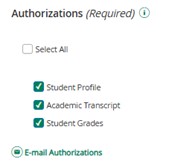
- Authorizations must be set to allow access. Access may be granted to all available pages or on a per page basis.
- Student Profile page – grants access to curriculum, overall GPA, and earned hours, and registered courses
- Academic Transcript page – grants access to complete academic class history with grades
- Student Grades page – grants access to current semester grades
- Authorizations must be set to allow access. Access may be granted to all available pages or on a per page basis.

You must return to the proxy information page after creating the account and use the E-mail Authorizations icon to send the proxy the pages they may access. The system will not email the proxy automatically.
- Click on Submit to complete proxy access set-up.
When you add a new proxy, the proxy will receive three emails (not necessarily in the order listed below) at the email address you entered when setting up their account.
- Email #1: Action Required-Ship Proxy Access–Temporary Link - This email alerts your proxy that access has been established and provides a temporary account activation link (Access URL) to use to activate their access. NOTE: This link may only be used once and expires after 5 days.
- Email #2: Action Required-Ship Proxy Account–Temporary Password – This email includes a temporary password used when accessing the temporary account activation link.
- Email #3: Shippensburg University-Proxy Access – This email provides a link to the proxy portal. This link should be used after initial account activation is completed.
You will also receive a copy of email #1 and #3. You will not receive a copy of email #2.
Visit proxy access proxy instructions for detailed instructions on how a proxy activates their access.
How do I update the information associated with a proxy, including their access?
- Log in to the Experience myShip
- Navigate to the Student – Quick Access
- Click the Student Quick Links
- Click on the Personal Information link under the My Personal Information
- Click on the Proxy Management
- Click on the pencil icon
 located below the Proxy’s name.
 - Make any necessary updates to the proxy information (email address, passphrase or access being granted).
- Click on Submit to submit the updates.
If you wish to end access by modifying the end date, you will want to set the date to the day before to terminate access immediately.
No email is automatically sent to the proxy notifying them of the changes made.
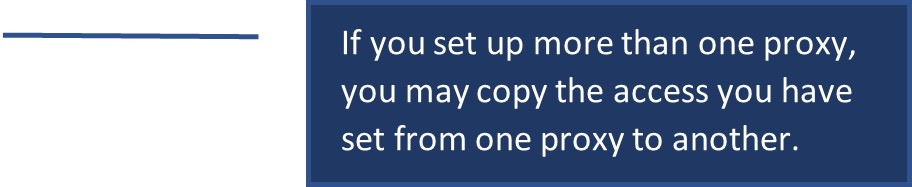
If you wish to make the proxy aware of changes made to a passphrase, you may use the E-mail Passphrase icon to email the proxy the new passphrase you have set for them. ![]()
![]()
If you wish to make the proxy aware of changes made to the forms to which they have access, you may use the E-mail Authorizations icon to email the proxy the new authorizations you have set for them. ![]()
![]()
How do I delete a proxy?
- Log in to the Experience myShip
- Navigate to the Student – Quick Access
- Click the Student Quick Links
- Click on the Personal Information link under the My Personal Information
- Click on the Proxy Management
- Click on the trash can icon
 located below the Proxy’s name.
 - Click on Delete when prompted to confirm you want to delete the proxy.
When you delete a proxy, the proxy will receive an email notifying them their access has been deleted. You will also receive a copy of this email.
How do I reset a password for a proxy who has forgotten their password?
The proxy should be able to use the Forgot Password link on the log in page to reset their password. Instructions are available to the proxy at (add link to proxy instructions).
A student may also do this for a proxy by following the instructions below.
- Log in to the Experience myShip
- Navigate to the Student – Quick Access
- Click the Student Quick Links
- Click on the Personal Information link under the My Personal Information
- Click on the Proxy Management
- Click on the pencil icon located below the Proxy’s name.
- Click on the Reset Password link located by the proxy’s name and email address.

When you reset the password for a proxy, the proxy will receive two emails at the email address associated with their proxy account.
- Email #1 – This email incudes a link to reset the password. NOTE: This link may only be used once and is only valid for 5 days.
- Email #2 – This email includes a temporary password to be used to initiate the password reset process.
You will also receive a copy of email #1. You will not receive a copy of email #2. Additionally, once the proxy has reset their password, you will receive an email indicating their proxy profile has been updated.
How do I check to see if a proxy has accessed my information?
- Log in to the Experience myShip
- Navigate to the Student – Quick Access
- Click the Student Quick Links
- Click on the Personal Information link under the My Personal Information
- Click on the Proxy Management
- Click on the pencil icon located below the Proxy’s name.
- Click on the History tab to view the history of the proxy’s transactions.
Where can I find all communications sent to a proxy and resend a communication if needed?
- Log in to the Experience myShip
- Navigate to the Student – Quick Access
- Click the Student Quick Links
- Click on the Personal Information link under the My Personal Information
- Click on the Proxy Management
- Click on the pencil icon located below the Proxy’s name.
- Click on the Communication tab to view all communications sent to a proxy. There is a resend button next to each communication that will allow you to resend a communication if needed.